Your First OpenAI API Call
After installing the OpenAI Python Library, the next step is making your:
First OpenAI API Call
This is one of the most important milestones in learning modern Agentic AI development because it establishes the foundation for:
- AI agents
- reasoning systems
- tool-calling workflows
- autonomous applications
- coding assistants
- research agents
- orchestration systems
In this tutorial, you will learn:
- how API calls work
- how to connect Python to OpenAI models
- how chat completions operate
- how to process responses
- how modern AI applications communicate with models
By the end of this article, you will have a fully working Python script that sends a request to an AI model and prints the generated response.
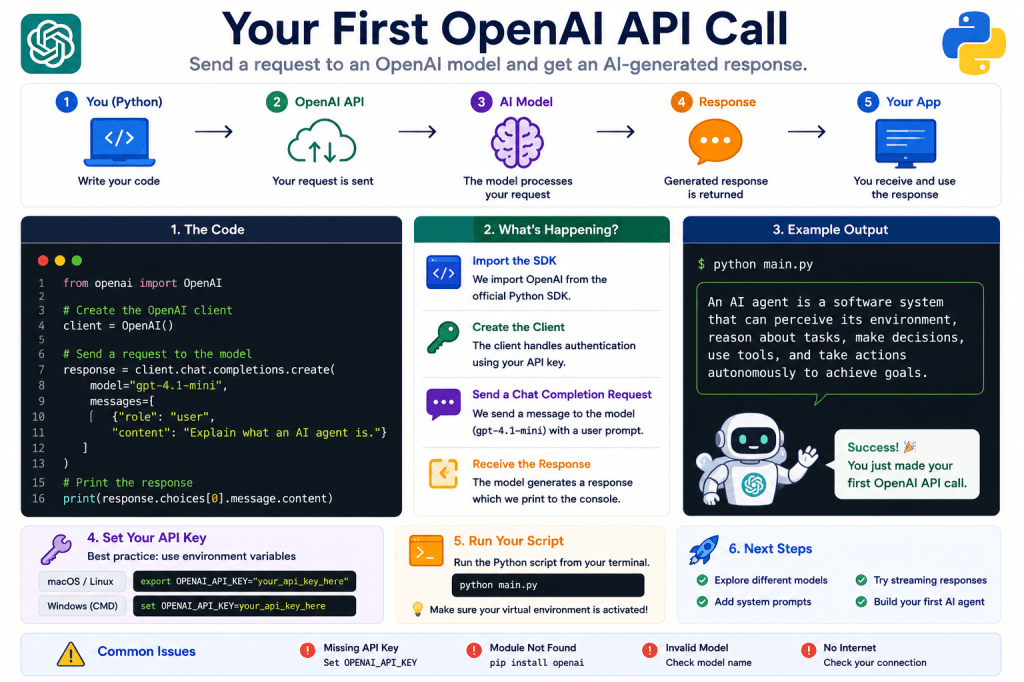
What Is an API Call?
An API call is a request sent from your application to an external service.
In this case:
Python Script ↓OpenAI API ↓AI Model ↓Generated Response
Your Python application sends:
- prompts
- instructions
- messages
The model processes the request and returns:
- generated text
- structured outputs
- reasoning
- tool calls
- embeddings
- responses
This communication layer powers nearly every modern AI application.
Why API Calls Matter for Agentic AI
Every AI agent eventually depends on:
- model inference
- reasoning
- orchestration
API calls are the mechanism that connects:
- your software
to - AI intelligence
Without API calls:
- no reasoning occurs
- no planning happens
- no agent execution is possible
This is the core interaction layer of modern AI systems.
Prerequisites
Before continuing, you should already have:
- Python installed
- the OpenAI SDK installed
- an API key configured
Install the SDK if needed:
pip install openai
pip install openai
Set your API key.
Windows
set OPENAI_API_KEY=your_api_key_here
macOS / Linux
export OPENAI_API_KEY=your_api_key_here
Create the Project
Create a folder:
first_api_call/│├── main.py└── requirements.txt
Step 1 — Import the SDK
Create:
main.py
Add:
from openai import OpenAI
This imports the official SDK client.
Step 2 — Create the Client
Now initialize the connection:
client = OpenAI()
The SDK automatically reads:
OPENAI_API_KEY
from your environment variables.
Step 3 — Send Your First Request
Now create your first API call.
Add:
response = client.chat.completions.create( model="gpt-4.1-mini", messages=[ { "role": "user", "content": "Explain what an AI agent is." } ])
This sends:
- a message
- to a model
- through the OpenAI API
Step 4 — Print the Response
Now display the generated output.
Add:
print(response.choices[0].message.content)
This extracts the assistant’s reply from the response object.
Full Working Code
Here is the complete script:
from openai import OpenAI

# Create the OpenAI client
client = OpenAI()

# Send a request to the model
response = client.chat.completions.create(
    model="gpt-4.1-mini",
    messages=[
        {
            "role": "user",
            "content": "Explain what an AI agent is."
        }
    ]
)

# Print the response
print(response.choices[0].message.content)
👉 You can experiment with a practical Python implementation of this concept in the official GitHub repository for the Programming Agentic AI examples: https://github.com/BenardoKemp/programming-agentic-ai/tree/main/your-first-openai-api-call
Run the Script
Execute:
python main.py
Example output:
An AI agent is a software system that can reason,make decisions, use tools, and perform tasksautonomously to achieve goals.
Congratulations —
you have successfully connected Python to an AI model.
Understanding the Code
Let’s break everything down carefully.
Import the SDK
from openai import OpenAI
This imports the official OpenAI client.
Create the Client
client = OpenAI()
This initializes:
- authentication
- networking
- API communication
Create the Chat Completion
client.chat.completions.create(...)
This is one of the most important methods in the SDK.
It sends:
- messages
- prompts
- instructions
to a language model.
Select the Model
model="gpt-4.1-mini"
This tells the API which model should process the request.
Different models vary in:
- reasoning ability
- speed
- cost
- context size
Messages Structure
Messages are sent as a list.
Example:
messages=[ { "role": "user", "content": "Explain AI agents." }]
Modern OpenAI APIs are conversation-based.
Roles include:
- system
- user
- assistant
The Response Object
The API returns a structured response object.
Example:
response.choices[0].message.content
This extracts:
- the generated text
from the response.
The Chat Completion Architecture
Modern AI applications typically use:
System Message ↓User Message ↓Assistant Response
This conversational structure powers:
- chatbots
- AI agents
- coding assistants
- autonomous workflows
Adding a System Prompt
System prompts guide model behavior.
Example:
response = client.chat.completions.create( model="gpt-4.1-mini", messages=[ { "role": "system", "content": "You are an expert AI tutor." }, { "role": "user", "content": "Explain embeddings." } ])
System prompts become extremely important in:
- AI agents
- orchestration systems
- reasoning workflows
Multi-Turn Conversations
You can provide conversation history.
Example:
messages=[ { "role": "user", "content": "What are embeddings?" }, { "role": "assistant", "content": "Embeddings are vector representations." }, { "role": "user", "content": "Why are they important?" }]
This creates conversational memory.
Common Beginner Mistakes
Missing API Key
Example error:
OpenAIError: api_key must be set
Solution:
- configure OPENAI_API_KEY
Incorrect Python Environment
Sometimes the SDK installs in the wrong environment.
Verify:
pip show openai
Wrong Model Name
Invalid model names cause errors.
Always verify model availability.
Internet Connectivity
API calls require internet access.
Offline execution will fail.
Why This Matters for AI Agents
Even though this example is simple, it already demonstrates the core mechanism behind:
- AI agents
- reasoning systems
- coding assistants
- autonomous workflows
Every advanced AI system begins with:
API communication
This is the first building block of Agent Engineering.
What Comes Next?
After your first API call, the next logical topics are:
- Chat Completions Explained
- System Prompts Explained
- Streaming Responses
- Structured Outputs
- Tool Calling
- Building Your First AI Agent
- Reflection Loops
- AI Agent Memory Systems
These progressively evolve into full Agentic AI architectures.
Suggested Experiments
Try changing:
- the prompt
- the system message
- the model
- the conversation structure
Experimentation is one of the fastest ways to understand:
- prompting
- reasoning behavior
- model responses
Related Topics
This tutorial connects closely to:
- Installing the OpenAI Python SDK
- Python Agent Programming
- Tool Calling Explained
- Chain-of-Thought Reasoning
- AI Agent Skills
- Structured Outputs
- AI Agent Workflows
Together, these concepts form the programming foundation of modern Agentic AI systems.
Final Thoughts
Making your first OpenAI API call is the moment where:
- Python code
and - AI reasoning
first connect together.
That single API request is the foundation for:
- AI agents
- autonomous workflows
- reasoning systems
- coding assistants
- orchestration architectures
As you continue learning Agentic AI development, nearly every advanced system you build will expand upon this same fundamental interaction pattern:
- send instructions
- receive reasoning
- orchestrate actions
- continue execution
This simple API call is the first step into modern AI engineering.
 Programming Agentic AI